15 Android settings that’ll strengthen your security
You may not understand it from all of the panic-inducing headlines on the market, however Android is definitely full of sensible and highly effective safety choices. Some are activated by default and defending you whether or not you understand it or not, whereas others are extra out of the way in which however equally deserving …
You may not understand it from all of the panic-inducing headlines on the market, however Android is definitely full of sensible and highly effective safety choices. Some are activated by default and defending you whether or not you understand it or not, whereas others are extra out of the way in which however equally deserving of your consideration.
So cease losing your time worrying concerning the overhyped Android malware monster du jour and as a substitute take a second to look by way of these way more significant Android settings — starting from core system-level components to some extra superior and simply missed choices.
Make your manner by way of these 15 particular Android settings, then make your manner over to my Android Intelligence e-newsletter to get three unique bonus ideas on your favourite telephone this second.
Prepared? Prepared. Let’s do that:
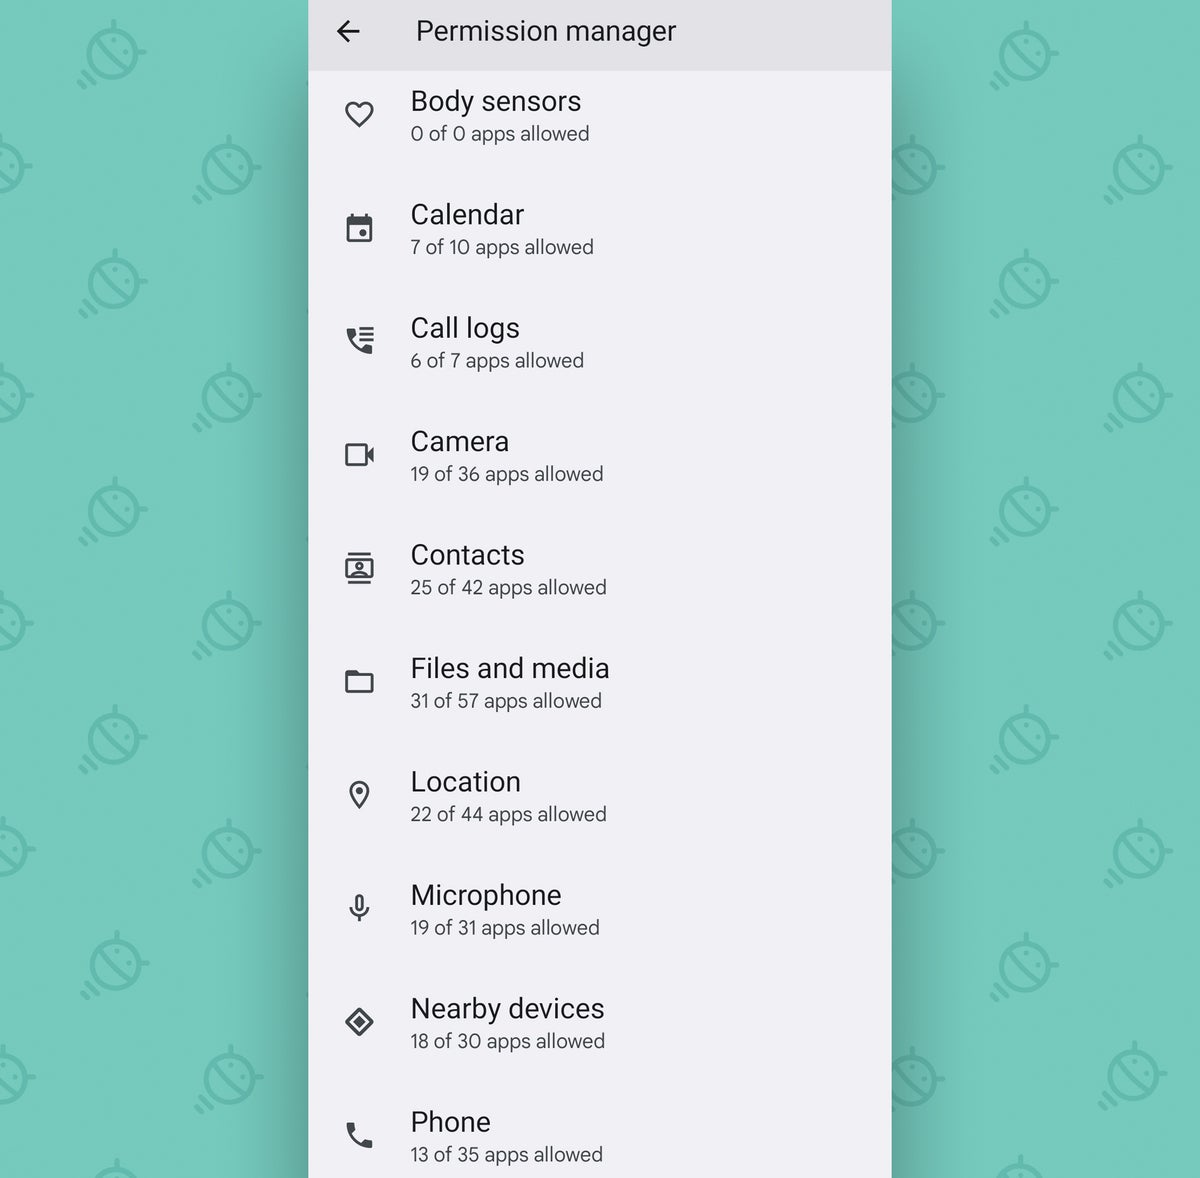
Android setting No. 1: App permissions
A not often spoken actuality of Android safety is that your individual negligence — both in failing to correctly safe your machine ultimately or in leaving open too many home windows that permit third-party apps entry to your data — is way extra more likely to be problematic than any method of malware or scary-sounding boogeyman.
So let’s deal with the primary a part of that proper off the bat, lets? Regardless of what some sensational tales would possibly lead you to consider, Android apps are by no means capable of entry your private information or any a part of your telephone except you explicitly give ’em the go-ahead to take action. And when you cannot undo something that is already occurred (except you occur to personal a time-traveling DeLorean — during which case, nice Scott, drop me a line), you can return and revisit all of your app permissions to verify all the things’s in tip-top form for the longer term.
That is advisable to do periodically, anyway, and notably now — as a number of latest Android variations have included some necessary new app permission choices.
Particularly, now you can let apps entry your location solely after they’re actively in use, as a substitute of on a regular basis (as of Android 10); you possibly can approve sure permissions solely on a one-time, limited-use foundation (as of Android 11); and you may decide how detailed of a view any given app will get of your location whenever you grant it that entry (as of Android 12). However any apps that had been already in your telephone by the point these upgrades arrived would’ve already had full, unrestricted entry to these areas of your machine. And it is as much as you to revisit ’em and replace their settings as wanted.
So do that: Head into the Safety & Privateness part of your Android settings and discover the “Permission supervisor” line. (Relying in your machine, you may need to faucet a line labeled “Privateness” earlier than you see it.) That’ll present you a listing of all obtainable system permissions, together with particularly delicate areas reminiscent of location, digital camera, and microphone — the identical three areas, by the way, that may be restricted to one-time use solely on any telephone operating at the least Android 11.
JR
Faucet on a particular permission, and you will see a breakdown of precisely which apps are approved to make use of it and in what manner.
JR
You possibly can then faucet on any app to regulate its stage of entry and produce it down a notch, when relevant, or take away its entry to the permission totally — and, in case you’ve obtained Android 12 or increased, additionally choose whether or not the app ought to get entry to your exact location or solely a far much less particular approximate view of the place you might be.
JR
If there’s one part of your Android settings price spending the time to revisit, that is for sure it.
(And in case you do not see a “Permission supervisor” possibility in your telephone, by the way in which, attempt wanting within the Apps part of your Android settings as a substitute. You possibly can then pull up one app at a time there and discover its permissions that manner.)
Android setting No. 2: Play Defend
Talking of apps in your telephone, it is a effective time to speak about Google Play Defend — Android’s native safety system that, amongst different issues, repeatedly scans your telephone for any indicators of misbehaving apps and warns you if something suspicious emerges.
(And sure, it does generally fail to detect shady gamers instantly — one thing that will get performed as much as a comedic diploma in deceptive advertising and marketing campaigns — however even in these cases, the real-world menace to most folk is often fairly minimal.)
Until you (or another person) inadvertently disabled it sooner or later, Play Defend ought to be up and operating in your telephone already — but it surely actually cannot harm to double-check and ensure.
To take action, simply open up the Privateness & Safety part of your Android settings. Faucet the road labeled both “Google Play Defend” or “App safety,” then faucet “Google Play Defend,” if wanted, and faucet the gear icon within the upper-right nook of the display screen and ensure each of the toggles within the display screen that comes up are activated.
Again on the principle Play Defend display screen, you will see a standing replace displaying you that the system is lively and operating. It really works totally by itself, mechanically, however you possibly can all the time set off a handbook scan of your apps on that very same web page, in case you’re ever so inclined (or perhaps simply feeling twitchy).
JR
Android setting No. 3: Secure Shopping
Chrome is often the default Android browser — and so long as you are utilizing it, you possibly can relaxation somewhat simpler understanding it will warn you anytime you attempt to open a shady website or obtain one thing harmful.
Whereas Chrome’s Secure Shopping mode is enabled by default, although, the app has a more moderen and more practical model of the identical system referred to as Enhanced Secure Shopping. And it is as much as you to decide in to it.
This is how:
Open up Chrome in your telephone.
Faucet the three-dot menu icon within the app’s upper-right nook and choose “Settings” from the menu that comes up.
Faucet “Privateness and safety,” then choose “Secure Shopping.”
Faucet the dot subsequent to “Enhanced safety” on the subsequent display screen you see.
Whilst you’re there, again your self out to the principle Chrome settings menu and choose “Security test.” That’ll reveal a useful one-tap device for scanning your numerous browser settings and saved passwords and letting you recognize of something that wants consideration.
Android setting No. 4: Suspicious message safety
From the net to your messages, probably the most frequent types of digital chicanery is a modern-day ruffian making an attempt to trick you into sharing your private data — both by posing as some official-seeming supply and convincing you to ship delicate particulars or by conning you into clicking a hyperlink that does one thing dicey.
As of Android 13, Google’s obtained an possibility to assist defend you from a few of these shenanigans. Surprisingly, it is not displaying up on all gadgets in the meanwhile, but it surely’s price checking to see if it is obtainable on yours.
The best manner is to look your system settings for the phrase suspicious. For those who see an possibility referred to as “Suspicious message alerts,” faucet it — then be sure that the toggle subsequent to “Enable alerts” is lively inside it.
For those who do not see that possibility, scratch your head in befuddlement after which set your self a reminder to test this once more in a month or two to see if it magically reappears.
Android setting No. 5: Lock display screen data
If another person ever will get their sweaty paws in your telephone, you don’t need ’em to have the ability to entry any of your private and/or firm info — proper?
Properly, take observe: Android sometimes reveals notifications in your lock display screen by default — which implies the contents of emails or different messages you obtain may be seen to anybody who appears at your machine, even when they cannot unlock it.
For those who are likely to get delicate messages or simply need to step up your safety and privateness sport, you possibly can prohibit how a lot notification data is proven in your lock display screen by going to the Safety & Privateness part of your Android settings, tapping the road labeled “Extra privateness settings,” in case you see it — then tapping “Notifications on lock display screen” and altering its setting from “Present all notification content material” to both “Present delicate content material solely when unlocked” (which can filter your notifications and put solely these deemed as “not delicate” onto the lock display screen) or “Do not present notifications in any respect” (which, as you’d count on, is not going to present any notifications in your lock display screen in any way).
For those who’re utilizing a Samsung telephone, you will discover those self same choices throughout the Notifications part of the system settings — although, sadly, with much less nuance concerned (as Samsung has for no obvious motive eliminated the “delicate” notification differentiation from the settings on its model of Android).
By default, Android makes the entire shortcuts in your telephone’s Fast Settings space — y’know, that panel of one-tap tiles that reveals up whenever you swipe down from the highest of the display screen — obtainable even when the machine is locked.
Something that takes you to a different space of the working system will nonetheless require authentication, after all, however the easy on-off tiles could be tapped and toggled by anybody who’s holding the telephone.
As a rule, that is an added comfort. Say you need to flip in your telephone’s Bluetooth for a quick connection, for example, or flash in your flashlight to seek out that stray tacky poof that slipped out of your sticky grabbers and fell onto the ground. Having the ability to do these issues with a pair fast faucets and with out having to unlock your telephone can actually be useful.
On the identical time, although, it could possibly additionally permit somebody else to do one thing like change your telephone’s sound settings, disable its Wi-Fi connection, and even put it into airplane mode. And in case you’re actually aiming for the tightest safety obtainable, you most likely don’t desire that kind of stuff to be attainable.
This is the excellent news: For those who’ve obtained a tool with a latest Android model, you possibly can take management and switch at the least some of these controls off within the lock display screen setting. With Android 12 and up, march into the Show part of your Android settings and faucet “Lock display screen.” Flip the toggle subsequent to the “Present machine controls” possibility into the off place, then make a celebratory squawking sound and get your self a soda.
With Samsung telephones, you will as a substitute want to go into the Lock Display screen part of your settings and faucet the road labeled “Safe lock settings.” There, you will discover an choice to “Lock community and safety,” which prevents any network-related toggles from being utilized in that context.
Android setting No. 7: NFC safety
Whereas we’re fascinated about your lock display screen, take two seconds to safe any digital switch mechanisms linked to your telephone and ensure they’re obtainable solely when your machine is unlocked.
It is probably the most obvious-seeming Android settings, and but, in case you do not actively allow it, it will not be current — and all the things from bank cards to domestically saved information may very well be considerably extra vulnerable to theft consequently.
This selection’s current solely in Google’s core Android software program and not in Samsung’s closely modified implementation of the working system.
For those who’ve obtained a Pixel or one other telephone that is utilizing a extra unadulterated Android setup, although, search your system settings for NFC and search for the road labeled “Require machine unlock for NFC.” Flip the toggle subsequent to it into the on place, then relaxation simple understanding no method of wi-fi switch can happen when your machine is locked.
Android setting No. 8: Sensible Lock
Safety is just helpful in case you really use it — and given the additional stage of inconvenience it usually provides into our lives, it is all too simple to let our guards down and get lazy after some time.
Android’s Sensible Lock characteristic is designed to counteract that tendency by making safety a teensy bit much less annoying. It could actually allow you to mechanically preserve your telephone unlocked everytime you’re in a trusted place — like your house, your workplace, or that weird-smelling restaurant the place you eat barbeque sandwiches nearly disgustingly usually — and even whenever you’re linked to a trusted Bluetooth machine, like a smartwatch, some earbuds, or your automobile’s audio system.
JR
Relying in your machine, you will need to search for the “Display screen Lock” possibility within the Safety part of your Android settings (with older Android variations), look underneath both “Superior settings” or “Extra safety settings” throughout the Safety & Privateness part (with Android 12 and up), or look within the Lock Display screen part of your settings (on a Samsung telephone) to discover the probabilities.
And in case you ever discover the Trusted Locations a part of Sensible Lock is not working reliably, by the way in which, this is the 60-second repair.
Android setting No. 9: Two-factor authentication
This subsequent one’s technically a Google account safety possibility and never particular to Android, but it surely’s very a lot linked to Android and your general smartphone expertise.
You understand what two-factor authentication is by now, proper? And also you’re utilizing it in all places you possibly can — particularly in your Google account, which might be related to all kinds of delicate information? RIGHT?!
For those who aren’t, by golly, now’s the time to begin. Hustle over to the Google part of your Android settings, faucet “Handle your Google Account,” after which scroll throughout that prime row to pick the “Safety” tab. Discover and faucet “2-Step Verification” and comply with the steps to set issues up.
For most individuals, I would suggest utilizing your telephone’s personal “Safety Key” possibility because the default technique, if it is obtainable, adopted by “Google prompts” and an authenticator app as secondary strategies. For that final half, you will have to obtain and arrange an app like Google’s personal Authenticator or the extra versatile Authy to generate your sign-in codes.
For those who actually need to take your Google account safety to the max, you may as well go a step additional and arrange a Google passkey in your telephone for even stronger safety — or buy a particular standalone {hardware} key that’ll management the method and be required for any profitable sign-in to happen.
It’s going to add an additional step into your sign-in sequence, however that is one space the place the minor inconvenience could be very a lot definitely worth the tradeoff for enhanced safety.
Android setting No. 10: Lockdown mode
Supplied you are utilizing a telephone with Android 9 or increased (and in case you aren’t, switching over to a present telephone that really will get lively software program updates ought to be your prime safety precedence!), an Android setting referred to as lockdown mode is effectively price your whereas to analyze. As soon as enabled, it offers you a simple option to briefly lock down your telephone from all biometric and Sensible Lock safety choices — which means solely a sample, PIN, or password can get an individual previous your lock display screen and into your machine.
The thought is that in case you had been ever in a state of affairs the place you thought you may be pressured to unlock your telephone along with your fingerprint or face — be it by some kind of legislation enforcement agent or simply by a daily ol’ hooligan — you could possibly activate the lockdown mode and know your information could not be accessed with out your specific permission. No notifications will ever present up in your lock display screen whereas the mode is lively, and that heightened stage of safety will stay in place till you manually unlock your telephone (even when the machine is restarted).
The trick, although, is that on sure telephones — together with most Samsung Android gadgets — you must allow the choice forward of time to ensure that it to be obtainable. To substantiate that it is activated in your machine, open up your Android settings, seek for the phrase lockdown, and ensure the toggle alongside “Present lockdown possibility” is about to the on place.
For those who’re utilizing a present telephone and do not see any outcomes for that search, the choice might be simply mechanically enabled — and also you should not must do something to make it obtainable.
Both manner, as soon as the system’s up and operating, it is best to see a command labeled both “Lockdown” or “Lockdown mode” anytime you press and maintain your telephone’s energy button (or press and maintain the facility button and volume-up button collectively, on sure gadgets). Optimistically, you will by no means want it. However it’s a great added layer of safety to have obtainable, simply in case — and now you understand how to seek out it.
Android setting No. 11: App pinning
One in all Android’s most sensible settings can also be certainly one of its most hidden. I am talkin’ about app pinning — one thing launched manner again in 2014’s Lollipop period and barely talked about since.
App pinning makes it attainable so that you can lock a single app or course of to your telephone after which require a password or fingerprint authentication earlier than the rest could be accessed. It may be invaluable whenever you move your telephone off to a buddy or colleague and need to make sure they do not by chance (or perhaps not so by chance) get into one thing they should not.
To make use of app pinning, you will first have to activate it by opening that trusty ol’ Safety & Privateness part in your Android settings after which discovering the road labeled “App pinning,” “Display screen pinning,” or probably “Pin app” or “Pin home windows.” (You will most likely must faucet a line labeled “Superior settings,” “Extra safety settings,” or “Different safety settings” to disclose it.) Faucet these phrases, no matter they’re in your particular machine, then flip the characteristic on and likewise be sure that the toggle to require authentication earlier than unpinning is activated.
Then, the subsequent time you are about to put your telephone in another person’s grubby palms, first open up your system Overview interface — both by swiping up from the underside of your display screen and holding your finger down, in case you’re utilizing Android’s gesture system, or by urgent the square-shaped button, in case you’re nonetheless hangin’ onto the old-school three-button nav setup.
On any telephone operating moderately latest software program, you will then faucet the icon of the app you need to pin, instantly above its card in that Overview space. And there, it is best to see the Pin possibility.
JR
As soon as you’ve got tapped that, you will not be capable to swap apps, return to your house display screen, take a look at notifications, or do the rest till you exit the pinning and unlock the machine. To try this, with gestures, you will swipe up from the underside of your display screen and maintain your finger down — and with the outdated three-button nav setup, you will press the Again and Overview buttons on the identical time.
Android setting No. 12: Visitor Mode
If you wish to go a step additional and let another person use all components of your telephone with out ever encountering your private info or having the ability to mess something up, Android has an unimaginable system that’ll allow you to do exactly that — with subsequent to no ongoing effort concerned.
It is referred to as Visitor Mode, and it has been round since 2014, even supposing most folk have utterly forgotten about it. For an in depth walkthrough of what it is all about and how one can put it to make use of, see my separate Android Visitor Mode information.
Simply observe that when you have a Samsung telephone, that information will not do you a lot good — as Samsung has for no obvious motive opted to take away this normal working system component from its software program (insert tangentially associated soapbox rant right here). On Google’s personal Pixel telephones and most different Android gadgets, although, it will take you all of 20 seconds to arrange and prepare.
Android setting No. 13: Discover My Gadget
Whether or not you’ve got merely misplaced your telephone round the home or workplace otherwise you’ve really misplaced it out within the wild, all the time do not forget that Android has its personal built-in mechanism for locating, ringing, locking, and even erasing a tool from afar.
Like Play Defend, the Android Discover My Gadget characteristic ought to be enabled by default. You can also make certain by heading into the Safety & Privateness part of your Android settings and tapping the road labeled “Discover My Gadget.” Double-check that the toggle on the prime of the display screen is turned on.
Utilizing a Samsung telephone? Samsung gives its personal superfluous, redundant service referred to as Discover My Cell, however the native Google Android model will convey all of your gadgets — not solely these made by Samsung — collectively right into a single place. and it is also way more versatile in how and the place it is capable of work. On a Samsung machine, the simplest option to discover the Android Discover My Gadget setting is to look your system settings for the phrase Discover My Gadget.
As soon as you’ve got confirmed the setting is enabled, in case you ever want to trace your telephone down, simply go to android.com/discover from any browser or do a Google seek for “discover my machine.” (There’s additionally an official Discover My Gadget Android app, when you have one other Android machine and need to preserve that perform standing by and prepared.)
So long as you are capable of signal into your Google account, you’ll pinpoint your telephone’s final recognized location on a map and handle it remotely in a matter of seconds.
Android setting No. 14: Emergency contact
Discover My Gadget is a unbelievable useful resource to have — however in sure conditions, you would possibly get a lacking telephone again even sooner with the assistance of a fellow hominid.
Give folks an opportunity to do the correct factor by including an emergency contact that may be accessed and dialed with a number of fast faucets out of your telephone’s lock display screen. To start out, go to both the About Telephone part of your Android settings or the Security & Emergency part, when you have it, after which discover and faucet the road labeled both “Emergency info” or “Emergency contacts.”
Comply with the prompts there so as to add in an emergency contact — a detailed buddy, member of the family, vital different, random raccoon, or no matter is smart for you. (Hey, I am not right here to evaluate.)
JR
Straightforward peasy, proper? Properly, nearly: The one problem is that the emergency contact data is not precisely apparent or easy to seek out on the lock display screen — go determine — so anybody who picks up your telephone may not even discover it.
However wait! You possibly can enhance the chances significantly with one additional step: Head into the Show part of your settings and faucet “Lock display screen” (which can be hidden inside an “Superior” subsection, relying in your machine), then faucet the road labeled “Add textual content on lock display screen.”
Nevertheless you get there, as soon as you end up dealing with a clean area for textual content enter, enter one thing alongside the strains of: “For those who’ve discovered this telephone, please swipe up after which faucet ‘Emergency name’ and ‘View emergency info’ to inform me” (or no matter particular directions make sense for the required steps on your particular machine).
That message will then all the time present up in your lock display screen — and as an added bonus, if there’s ever an precise emergency, you will be prepared for that, too.
Utilizing a Samsung telephone? For no obvious motive (sensing a theme right here?), Samsung has eliminated the direct emergency contact system and as a substitute gives solely the flexibility to put plain textual content in your lock display screen. You will discover that, although, by making your manner into the Lock Display screen part of your system settings and on the lookout for the road labeled “Contact info.”
For those who do not see that possibility, attempt as a substitute urgent and holding your finger onto the precise lock display screen in your Samsung telephone after which tapping the road towards the underside labeled “Contact info.”
Nevertheless you get there, you possibly can then kind your emergency contact data instantly into that space and hope that somebody finds it and dials it from their very own telephone if the state of affairs ever comes up.
Android setting No. 15: SIM card safeguard
Final however not least, in case your telephone ever does fall into the improper palms and its finder has less-than-honorable intentions, you need to do something you possibly can to maintain that particular person from having the ability to take over the machine totally.
And also you’d by no means understand it, however Android has an often-off-by-default possibility designed to guard you in precisely that manner.
Begin by looking out your system settings for SIM. Relying in your machine and your particular configuration, you would possibly see a few totally different choices seem within the outcomes.
With Pixels and different telephones operating Google’s authentic Android software program, you will probably see a line labeled “Affirm SIM deletion.” Faucet that, then flip the toggle subsequent to “Affirm SIM deletion” into the on place to require authentication earlier than any network-identifying SIM on the machine is erased.
On Samsung telephones, you will probably see a line labeled both “Lock eSIM settings” or “SIM card lock.” Faucet both of these after which comply with the next steps to safe it.
It is nearly shockingly simple to deal with — as long as you might have the foresight to guard your self earlier than the necessity really arises.
Yet another factor…
Now that you have your Android safety settings optimized and so as, take 10 minutes to carry out an Android safety checkup. It is a 16-step course of I’ve created for the state of safety on each your telephone and your broader Google account — and it is effectively price doing at the least every year.
The perfect a part of this checkup? It is utterly painless — and in contrast to with most preventative exams, eradicating your pants is totally elective.
Get much more Googley information with my Android Intelligence e-newsletter — three new issues to attempt each Friday and three particular bonus ideas in the present day.


 JR
JR 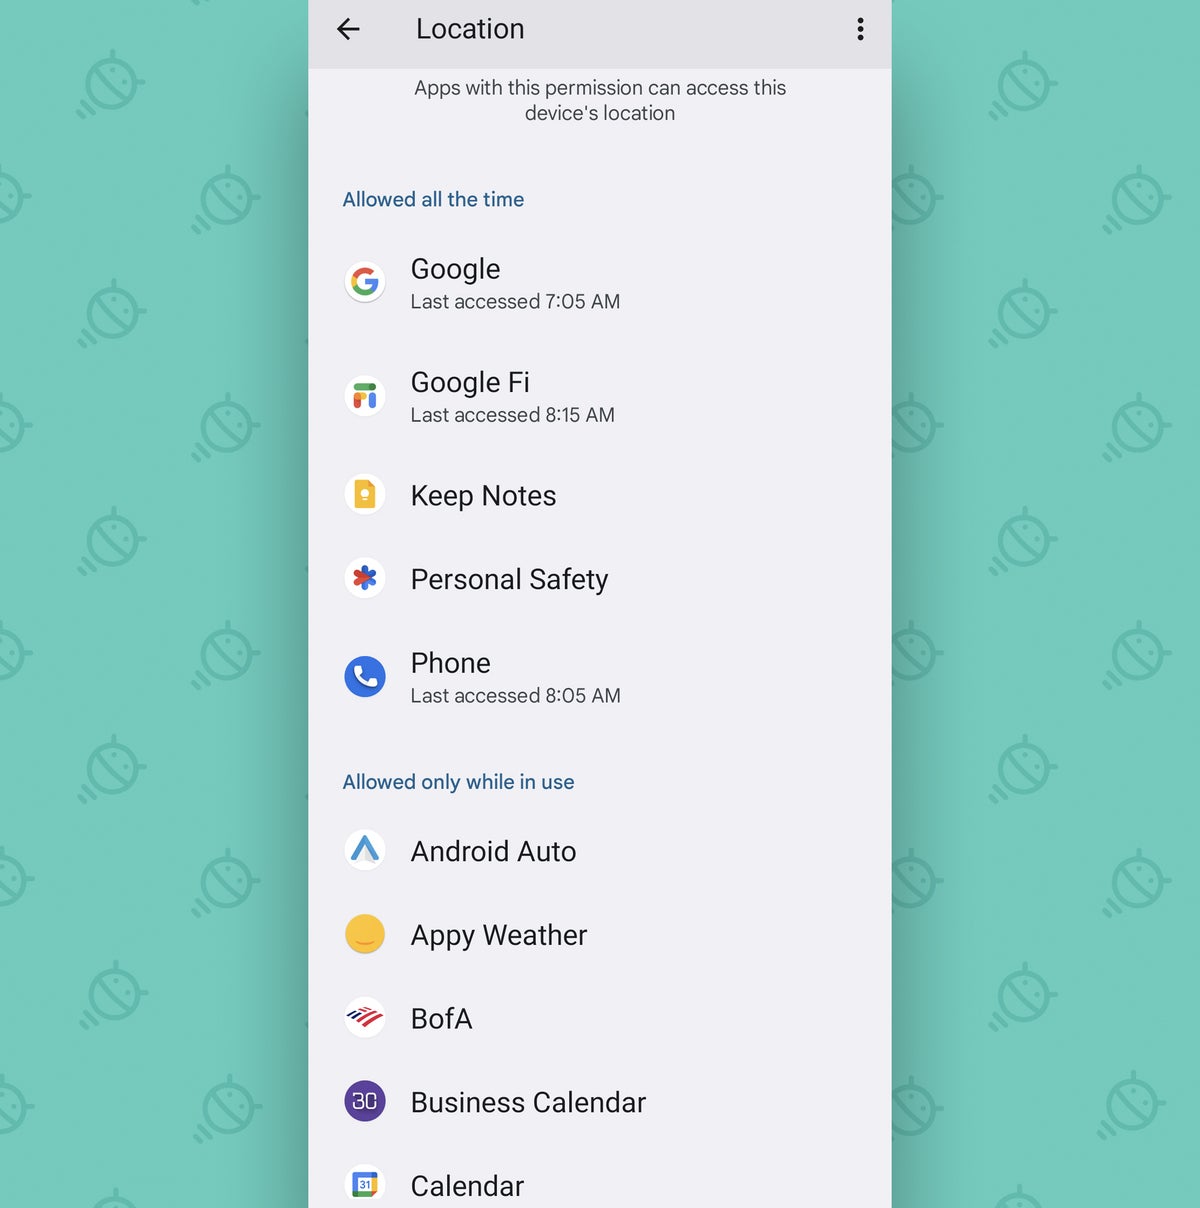 JR
JR 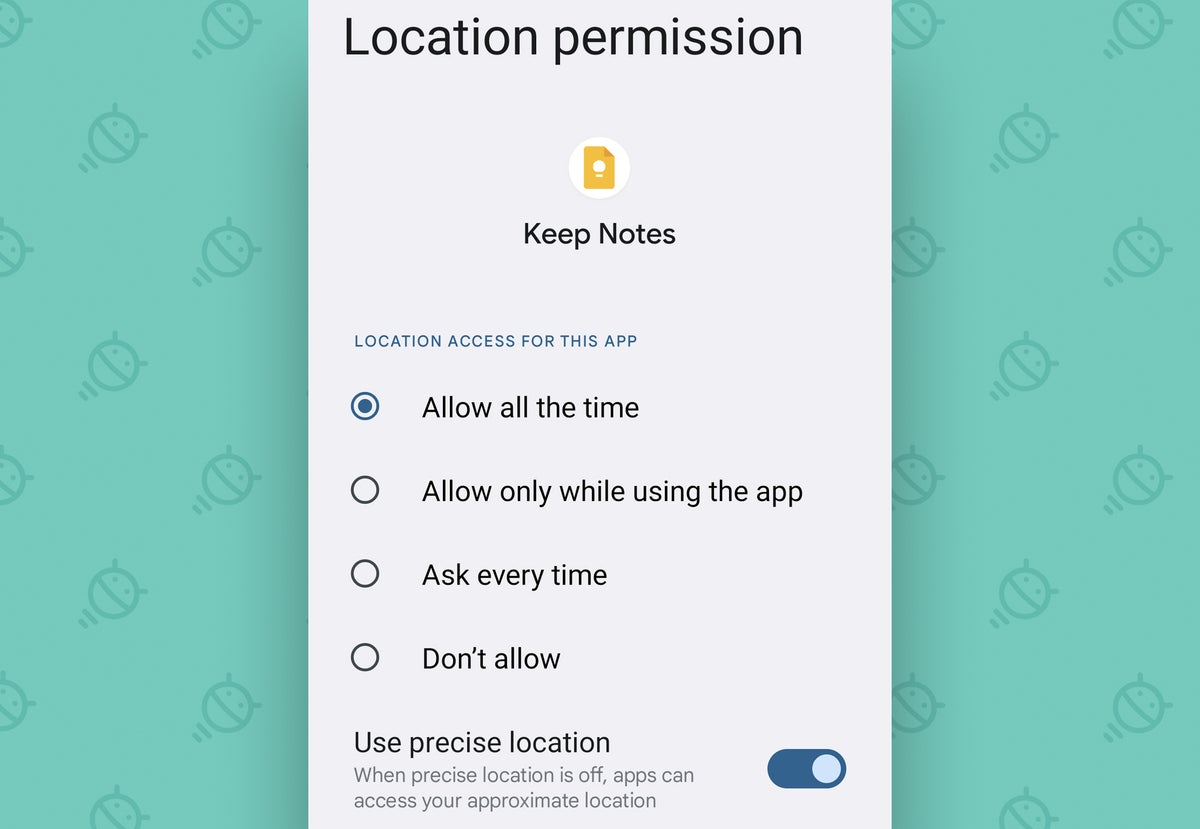 JR
JR  JR
JR 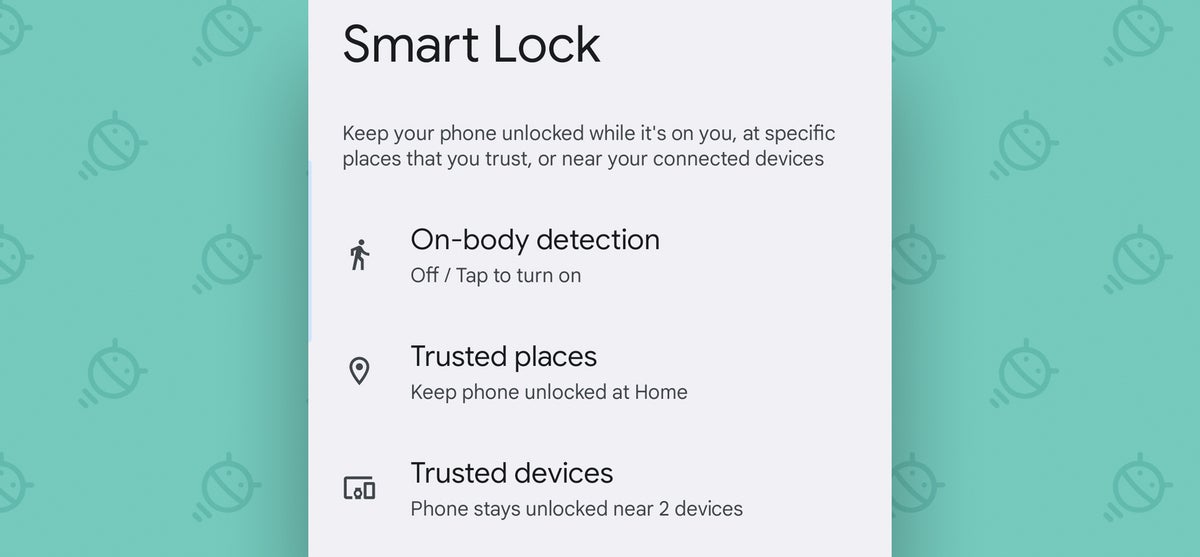 JR
JR 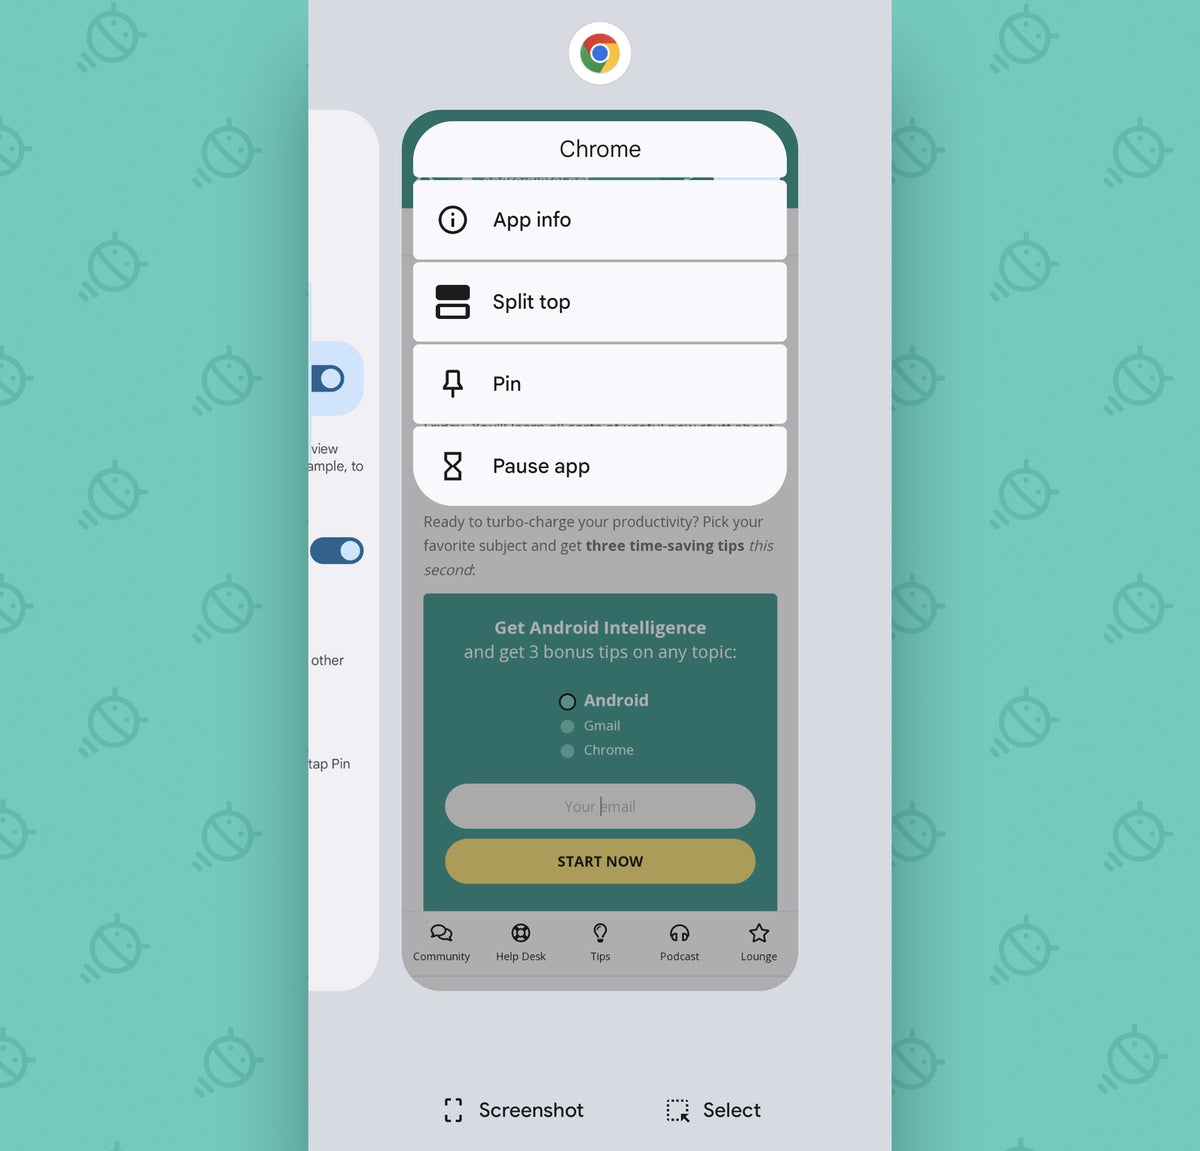 JR
JR  JR
JR